Tuesday 20 March 2012

Today the leds and forkgaitors came in.
For the leds I allready flattened a part of the handlebar and now I drilled holes in it, all the way through the handlebar and the top yoke.
When mounted you can't see the holes where the wiring will go trough, looks ok.
The gaitors I just put on to have a look at look... the front immediately gets that classic look from them, nice!


Saturday 17 March 2012

A busy day... just some minor works...
I lowered the headlight by 2,5CM... looks much better.
A nice horizontal line from the top future seat...over the top tank... straight to the headlight.


I ordered some led lights with an aluminum housing to replace the warning lights from the old dash... only the speedometer stays, so needed to find a solution for the warning lights.
At the centre of the handlebar, between the clamps I flattened a 7MM wide section by hammering and after that clean it up with a file. The leds, 5MM, will be placed through the handlebar and the wires will go through the top-yoke into the headlight.
( all chrome parts will be re-chromed later )


I thought about a solution for the front mudguard problem and it was actually not hard.
With a good gripwrench I slightly bended the edges from the top of the stabiliser, so the edges won't cut into the aluminum and between the fender and stabiliser I added a metal ring, 4x...
The bolts are fully tightened now, the fender isn't deformed anywhere and is mounted really solid!... perfect!
Not much time today... I only fabricated the front fork stabilizer wich also carries the front mudguard.
From a metal plate I cut a strip and bend it as a U...
I messured the boltholes from the old stabilizer and drilled the holes into the new one.


After that I messured 4 boltholes in the aluminum fender, spread apart as much as possible to create a stabil mounting from the fender.


I noticed that the stabilizer is flat on top while the fender has a round shape, so screwing the fender to the stabilizer would flatten the fender.
So at this moment the screws are not tightened, don't want to ruin the beautifull fender and have to figure out a way for the stabilizer to follow the shape of the fender.
Allthough the screws aren't tightened the fender is solid mounted, no movement at all, so maybe I won't make the lower fendersupport after all.... less is more!!
Yeah... less is more but this bike is not meant as a chopped bike and not even really a cafe-racer... I would prefer to call it a retro-street-bike in 1971 Italian style.
The bike, when it's ready, should be as an actual bike wich came from a factory in those days and should meet the standards from back then, building quality, safety etc.
But it's 2012 now, the bike is meant for riding so items like indicatorlights etc must be present.
The fork gaitors, seat-unit and the indicator stems didn't come in today... package is lost or just a little late.... yeah that also happens with my own ordered stuff... not only the customers orders!
By the way, I ordered very nice small aluminum indicatorlights in the shape of a... let's say a zeppelin LOL.
The vintage Honda lights I had in mind are no longer available...
The ones I ordered now really fit with the shape of the tank... we'll see..
I just took off the headlight to cut the headlightbrackets, the light will come down by 2,5CM.... that is 1 inch.

Thursday 15 March 2012

I bought a 400 ML can of 2 component PU foam, that wasn't nearly enough..
So I went back to the shop and bought a can of 750 ML wich would be extra foamy..
The 2 component blue stuff is great... next time I'll just buy a couple of those.
The normal green PU doesn't work well.... the inside of the foam doesn't dry so that was a mess...
I decided to cut the shape a little and let it dry again..
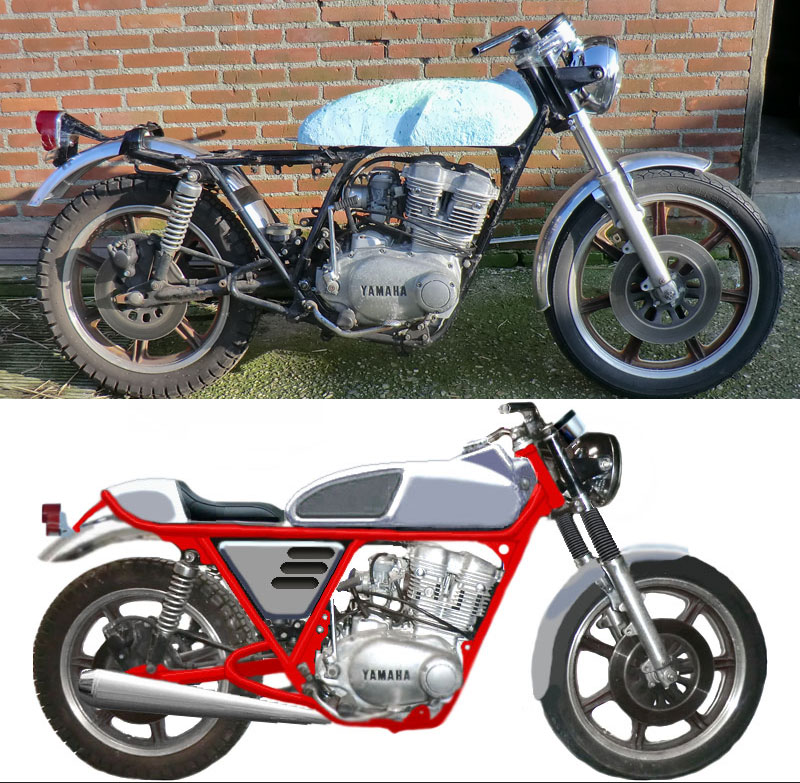
Today I started with shaping the tank... and shaping... and shaping.
I used a bread-knife for that... worked really well.... ( srry baby, I'll buy you a new one LOL )


And see the result so far ( right hand side only )... compare with the Testi tank... not bad!
The top-part where the fuel goes in I will make later and glue it on.


Meanwhile I thought about mounting the taillight... so I started looking on the internet for a taillightbracket from an XS 750 or something... then I remembered I have a '74 Kawasaki Z 400 Twin in parts and guess what I found!... a beautifull taillightbracket!!
The paint looks shitty but it will be chromed anyway.
I cut off the mountingplate for the Z 400 taillight and the shape of the Yamaha FS-1 taillight followed the exact shape of the bracket... beautifull!!
I messured the rear mudguard with the taillight and the licenceplate, so that afterwords it will look "factory"..
and cut the fender another 7 CM at the front side and nicely finished the cut edges.
Then I measured and drilled the holes for the taillightbracket and mounted it... the light itself is now just taped on it.


Look how nicely the backplate of the taillight fits the Kawasaki Bracket !


Next:  an overview from todays work.


Still keeping an eye on the original design.... so far so good I would say!


Next work:
- Creating a lower mounting bracket for the rear fender.
- Cutting of the rear frame.
- Creating a new fork-stabiliser / mounting bracket front fender.
- Creating a support bracket for the rear end of the front mudguard.
- Lowering the headlight about 2CM
- Creating a mountingbracket for the speedometer and thinking about the placement of the warning lights.
- Tomorrow I will be receiving black fork gaitors and 4 turnsignal stems; the front ones need to be fixed on the chrome things on the fork and the rear ones can be mounted when the new frame tubes are installed.
And maybe I will receive the rear end of the seat... I am not sure however if I am going to use it, or create my own design... we'll see...

Tuesday 13 March 2012

Today again some work on the fueltank.
I couldn't wait so I borrowed some old welding-device from the neighbours to finish the bottomplate from the tank.
The weldings are really terrible but that's no problem, it's only for the mould.
I made the plate about 10CM longer and bend it downwords so the fuel will go to the lowest point later where the fuelcock will be situated.
I also welded a piece of scrapmetal to make it more rigid.


At the rear-end I created a mountingplate for fixating the future tank.


More shaping work is done:


After finishing it I made a cardboard box at the size of the plate and filled it with PU foam.
Guess I have to leave it drying for a couple of days.


Monday 12 March 2012

The mould from the tank will be based on the standard bottomplate from the tank, while that fits nicely on the bike.
I am going to put it on the bottom of a box and fill the rest with PU foam.
I can cut out the basic shapes in the foam and after that shape the thing with clay ( or what is that brown stuff they are using.... have to do some homework for that )
In order to get a good attachement from the foam to he bottomplate I decided to give it a full brush, removing all dirt and rust.... doesn't look so bad after doing this!


Now I placed it on the bike and drew some lines while messuring various distances and cut the plate more narrow to the new shape of the tank.


On the bike and estimate if the new shapes can be realized.


Before I am going to PU-it-down in a box I need to make the tank about 10CM longer.
While I still haven't bought a welding device it has to rest a while....


In Photoshop I pasted the outline of the new tank on the bottomplate, so I have to cut some more tomorrow.


I also found another fuelcock in my stock of used parts, one from a 1995 Fireblade, it will be placed at the rear in the centre.

Sunday 11 March 2012

The fueltank

While especially the fueltank has to be modified to the specific look, I decided to create a complete new tank.
It will be fabricated from glass fibre with a coating in it to make it fuel-resistant.
In order to make a new tank I have to shape a model from wich I can make a negative mould in probably 3 parts.
I am going to use the original bottom from the tank to start the shape and today cut of the top part destroying the vintage 70's paintwork ( sorry Appie ).


The fueltank wasn't usefull anyway as you can see on the picture below, it was very dirty and a lot of rust...


After cutting it open I kind cleaned the edges while the future shape is more narrow.
Now I can put it down on the bike, drawing some cut-lines on it.


The new frame-tubes will follow the shape of the tank and the tank has to be made about 10CM longer.. some kind of "sharky-torpedo-shape"
Instead of the two fuelcocks the XS 500 has standard, I am going to install 1 centre fuelcock, borrowed from a 1993 CBR 600 F2.


Friday 9 March 2012

Aluminum mudguards

Today I received the aluminum mudguards I ordered through my company www.mega-moto.nl  and an early 70's Yamaha FS-1 taillight.
Here below a picture of the XS at this moment with the fenders taped on it, just to get an impression.


I decided that the headlight has to come down a bit to create a more straight line with the future tank and seat.

The taillight:


And the speedometer. It is the original meter ( notice the vintage cracks on the plate ) with a chrome back housing from a speedometer XS 750 special..... ( the original one is the same but in black )


The dream

I always dreamt of building my own bike, never had the time, 100's of other projects throughout my life!
After quiting being part of national and international racingteams I decided to make a start with the bike but first I'd like to do a learning project based on a Yamaha XS 500.
However I am in the professional motorcyclebusiness for more than 2 decades, the project will be partially new to me.
Metalwork needs to be done changing the frame to the specific look I have in mind, shaping and moulding needs to be done to get the fueltank and seat that I want.
What I have in mind are the looks of early 70's Italian bikes, in this case based on the looks of a moped, the Testi, here below.
I fell in love with the model and the shapes when my brother had one, years ago...


From a friend of mine, who was going to move from the Netherlands to Spain I bought this old Yamaha XS 500.... I could allready see the Testi in it!
The picture here below shows the XS with all unnecesary parts removed, a new low handlebar mounted and the headlight from an XS 750 Special because I love the round, vintage shape of it....
Nothing is cut off yet but I made the background white and I erased some frametubes so I can start making a design.


After making the background white, I started drawing.... looking sideways to the Testi.
My future bike, for wich I want to build a whole new frame will also look similar.
Here below the drawing I made.... let's see if the final result comes anywhere near it!